Showing posts with label Tutorial. Show all posts

Friday, May 13, 2011

Architectural Salvage Coat Hook

This is the stuff I love!
Taking found objects and re-purposing them into something practical and unique.


I picked up these architectural salvage pieces at a yard sale, along with a box of door knobs.


I distressed the wood a little more, using an orbital sander.
You can see a little yellow popping through around the edges.


I drilled a hole and added a screw in order to attach the knob with epoxy.


Not sure what these things are, but I picked them up at
my favorite junk shop, they work perfect for around the knob.


They have little teeth, so I just hammered it
into the wood around where the knob will go.


I picked up this epoxy at Walmart for around $3.


Filled the inside of the knob with epoxy and placed it over the screw.


Perfect fit!


I added a picture hanger with teeth on the back for hanging.


This didn't last long in the shop, it sold with in a few days!

Linking to:
Show & Tell Wednesdays 
Show & Tell Friday 
Sassy Sites

Sunday, January 2, 2011

Building A Wreath


I was commissioned to create a wreath for a local salon. 
He requested that I use neutral tones, so here's what I came up with!

I went to this awesome place that has so much fun stuff to decorate with, 
it's called Grenon's Trading Company in Bedford, NH. Their permanent botanicals 
are nothing like you'd find at Michael's, I decided to get all my supplies here!


Some wonderful wheat!


Not sure what this is, but I had to have it!


A little bit of Babies Breath.


Some shrooms and small pods, I love working with this stuff!


I started with an 18" grapevine wreath.


I usually stick a piece in, stand back, and see how it 
looks from a distance, then glue into place, using a hot glue gun.


It's starting to have a nice flow, but still so much more to add, 
and it always takes more than you think.


I will be adding a burlap ribbon to the left hand side, 
that's why it's not as full as the other side. I don't know about you, 
but I have really been into burlap lately!


Still not looking quite right. The bow is too skimpy, 
so I'll add a few more loops, but a different size.


Much better!


So...  what do you think?
Are you thinking you might need a new wreath for your front door this spring?

Linky parties I will be joining:

Tuesday, November 23, 2010

'Tis the Season Celebration!

Okay, I haven't been a slacker...  

I've been getting ready for our 
'Tis the Season Celebration 
this Sunday, November 28th from noon to 5:00 
at Rustique... The Rehab Boutique! 

We are having LIVE music by my honey, Stan Martin! 
He will be singing some of his originals, 
some Christmas songs and I'm sure he'll take requests!

Yummy Homemade Treats!

15% Off the Entire Shop! 
(Consignment items not included.)


This is the poster I designed for our big day. 
Background image from the Graphics Fairy.

Complimentary Gift!
(While supplies last.)
Each customer will get a bag of vintage inspired Christmas Tags.
Some images are from the Graphics Fairy and some are from Dover Publications, 
where you can get free samples every week when you sign up! 

Here's how I did it!
I downloaded images and brought them into Photoshop where I manipulated the 
images to look like vintage tags. I printed them on heavy card stock, 12-up on a sheet.


Then, I cut them out using an exacto knife and metal ruler.


Punched holes!


Added ribbon!


I used soft vintage colors. Here are some of my favorites!


Here they are in their little baggies, all ready to go!


I have these drawers from an antique Singer sewing machine,
(the rest of which was destroyed) I salvaged parts from it and thought 
this would be a great way to display the tags!


I hope you can join us!  

Now linking to: 

Metamorphosis Monday

Tuesday, October 12, 2010

Displaying Buttons For Sale

I saw this idea in a shop in Newburyport, MA and thought... 

What a great idea! 

Nobody takes a second look at the buttons in my shop, maybe now, they will!


I have all this great royalty free clip-art on my computer, 
I'm sure The Graphics Fairy has a lot to chose from too!


I made all the images about 3 x 5, some smaller, but all 3" wide. 
I printed as many as I could get on an 8 1/2 x 11 sheet of white card stock.


I cut them all to size using a cutting mat, exacto knife and metal ruler.


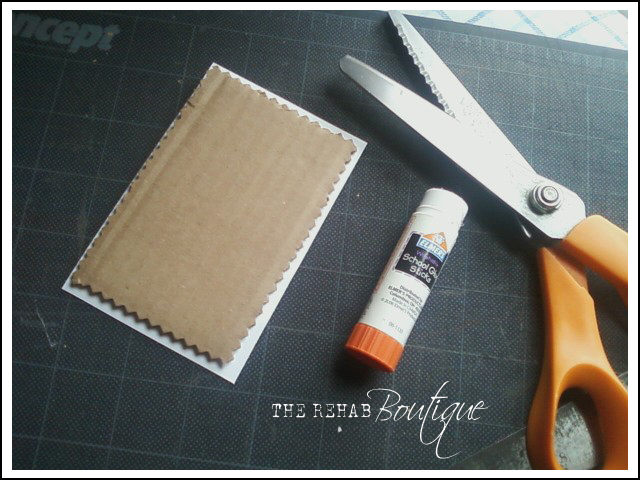
I then cut out pieces of cardboard from a box I had in my recycling bin, using pinking shears. I then glued the card board onto all the backs of the cards for extra support using a glue stick.


I chose buttons for each card, 
depending on their shape and color.
This was a perfect match!


How adorable!


I sewed the buttons on from the back, 
(you only see the thread on the back)
first using a small hole puncher to make life easier.


What do you think?


Friday, September 3, 2010

A Coat Rack with Character!

I am so excited about this project! 
Not much $, a little bit of time and an awesome outcome!

 
For the base I used a piece of wood that was an inset 
panel on a door, which already had a great patina (and it was free)! 


I found a bag of antique hooks at a tag sale (for a buck)!


I already had everything else I needed!


At first I was thinking of using a stencil, but this was much quicker!

I used a paint brush to cover the stamp with paint and 
experimented on paper until I felt comfortable with the outcome.


 I ended up stamping two layers, the yellow green didn't show up like I 
thought it would and I knew I couldn't get it exactly on top of the green so it ended up 
being more of a shadow under the antique white, giving it more depth.


I added a layer of decoupage medium in order to seal the 
chippy paint.  It also gave it a nice sheen and a more finished look.


Here it is in full view. It's a little hard to see the detail in this picture, 
but it's not quite this subtle in person.  I'm very happy with the outcome!

[Ooh-- I need to paint my front door!]


I'll have to make a bunch and put them in the shop!

What do you think?
I love hearing from you!

Now linking to:


LinkWithin

Related Posts with Thumbnails